Are you thinking about moving your website to a new hosting platform or domain? If so, you’re not alone! Web migration is a common task for many website owners.
There are various reasons why you may choose to migrate your site. It could be an acquisition or merging of a new company, rebranding or maybe you need to take advantage of new hosting features. Whatever your reason may be, it is important to carefully consider the potential risks and impacts of the migration before proceeding.
In this article, we’ll explore the key considerations and best practices for web migration in the context of Tech SEO (Technical Search Engine Optimization). We’ll cover the types of web migration, the planning and preparation that go into a successful migration, and the steps involved in the actual migration process. We’ll also discuss the potential risks and challenges of web migration and how to mitigate them.
What is a site migration?
Site migration simply put is the process of moving or transferring a website from one environment or platform to another. This could include but is not limited to
1. Relocation of a website from one web hosting provider to another,
2. Change of the content management system (CMS)
3. Complete redesign and restructure of your website.
4. Web migration can also encompass changes in domain names or URL structures.
Site migration can be a complex and time-consuming process, especially for large websites with a lot of content and a significant online presence. However, web migration can also be an opportunity to improve the performance and functionality of a website, as well as to address any technical or SEO issues that may be present on the existing site.
Do I need a site migration?

You need a site migration if you want to
- Improve UI/UX design for a better user experience,
- Changing hosting providers
- Change to a new servers (changes to IPs)
- Change to a new CMS platform
- Front-end redesign/Framework changes etc
Types Of Web Migration
There are several types of web migration out there however the most common include:
- Domain Name Migration
This type of web migration involves moving a website from one domain name to another without changing the website’s structure or content. You carry out domain name migration if you decide to change your domain.
- Hosting Platform Migration
This involves moving your website from one hosting platform to another. For example, moving from a shared hosting provider to a single host provider. It may be necessary to carry out this type of migration if your current hosting provider needs to meet your website needs or you simply want to switch to a different hosting provider.
- Content Management System (CMS) Migration
You are said to have carried out a content management system migration when you move your website from one CMS (for example moving from WordPress to Wix) to another. This kind of migration may be necessary if the current CMS platform is no longer supported or no longer meets the needs of your website.
By moving to a newer platform, you’ll be able to take advantage of the latest features and technologies, such as responsive design, improved security, and faster loading times. These are all factors that can have a big impact on the success of your website and can help you stay competitive in an increasingly crowded online marketplace
- Website Redesign and Restructuring Migration
This type of migration involves significant changes to the content and structure of the website. It can potentially include changing your domain name or hosting platform.
It may be necessary to carry out website redesign and structuring if your current website needs to meet the needs of your target audience or business.
Choosing the right type of web migration is dependent on your business goals and objectives. However, whichever type you decide to carry out, it is important to follow proven steps in order to prevent the unfortunate mishaps associated with web migrations.
Steps to carry out a successful site migration
Listed below are the most important steps to take when carrying out website migration, along with advice from SEO professionals to keep your migration SEO-friendly.
The steps are classified into 3
- Pre-migration planning
- Pre-migration testing
- Migration process
Premigration planning
- Set a clear migration goal and objectives
It’s important to be crystal clear about your goals and objectives of the web migration in order to guide the planning and execution process. Some questions you can ask yourself to enable you to have a defined goal include;
- What am I trying to achieve with the migration?
- Am I looking to improve the user experience, update my content management system, or move to a new domain?
Whatever your reasons may be, having a clear goal will enable you to have a clearer objective. For instance, if your goal is to make your site more mobile-friendly, your objective will be to improve ranking on SERP and increase traffic. In contrast, if you want to take your site internationally, your objective will solely be to increase traffic.
- Evaluating the current website
The next step in the web migration process is to assess the current website and identify any issues or areas for improvement. This may include evaluating the website’s performance (e.g., page load times or mobile-friendliness), Identifying technical issues (e.g., broken links or crawl errors), and analyzing the website’s current SEO performance (e.g., keyword rankings, traffic). This will help you determine the scope of the migration, the potential risks, and the challenges that may arise.
- Creating a detailed plan and timeline
A thorough and well-defined plan is essential for a successful web migration. This should include a list of tasks and responsibilities and a budget for any resources that may be required. It is also important to create a clear communication plan for stakeholders and team members.
Your plan should include potential risks and challenges. For example, you can check if there are any elements of your current website that may be difficult to migrate or that may not work on the new platform. Identifying these challenges early on will allow you to plan for them and find solutions.
- Gathering and organizing content and data
Before starting the migration process, it is important to gather and organize all the content and data that will be moved to the new websites. This includes databases or other data sources, text images, videos, and other media. It is a good idea to create a spreadsheet or another inventory format to ensure that no content is missed during the migration process.
- Verify all public-facing assets in the Search Console:
Before proceeding with a web migration, it’s essential to have a comprehensive understanding of the assets associated with your website that are visible to search engines and users. An example of a tool that can help you do this is Google Search Console, a tool that allows you to monitor and manage how your site appears in Google search results. You also need to understand assets that you don’t intend to be returned in search. This is crucial because it helps you gain a complete overview of your web presence and ensures that you have control over what search engines index.
- Verify CDNs and Load Balancers
Content Delivery Networks (CDNs) are used to distribute website content across multiple servers and locations, improving website performance and availability. It’s essential to verify CDN assets because they can affect how content is delivered to users.
Load Balancers: Load balancers distribute incoming web traffic across multiple servers to ensure optimal performance and reliability. Verifying load balancer assets ensures that traffic is correctly routed during and after the migration.
- Back up the current website
It is crucial to create multiple back-ups of the current websites before beginning the migration process. This will serve as a fallback option if something happens during the migration process. It is also good to create multiple backups at different stages of the websites. It is also safe to mention that all web content should be backed. To ensure safe exporting of content, extract all the data, text, images, and other media that make up your website’s content.
- Update the website’s internal link structure
Before starting the migration process it’s important to review and update the internal linking structure. Here, you check for functional internal links in the old website and update them if need be. Finally, you also need to check the user-friendly navigation structure of the new website. This is because internal linking structure plays a critical role in SEO performance.
- Notify search engines and stakeholders of your migration plan
It is important to inform search engines and stakeholders of the migration plan. search engines must be informed of the changes happening and your request to crawl the new websites. Finally, it is also important for stakeholders to know inorder to avoid confusion or any disagreement that might ensue.
Pre-migration Testing
Follow these steps to achieve a seamless pre-migration crawl
1. Recrawl the live website:
The purpose of this is to ensure that everything is fine and set to go. In this step, you scan your website’s pages and extract various types of data for analysis and migration planning.
In addition to using a web crawler (screaming, Lumar, sitebulb, etc.). It is essential to also use tools like Google Search Console, and Google Analytics during a recrawl. It provides valuable insights into search queries, indexing status, and potential issues that can affect your website’s visibility.
2. Crawl and compare the staging website with the live website
This step involves taking a list of your staging website URLs and uploading them to substitute those that were generated during your live website crawl for further processing or analysis. Different web crawler have their specific method for accessing staging websites.
To compare and crawl your live website with a staging website using Lumar follow the following steps
Step1
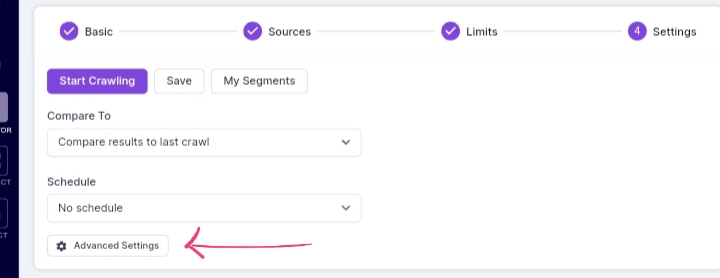
Start a fresh project crawl for your website just like you normally would. When the crawl is done, go back to the advanced settings in step 4 of the project setup.
Step2
Navigate to the test settings and upload a list of staging urls.
There, you can put in the details for your test site, like the test site web address and special DNS settings. If your test site needs a username and password for access, you can add those in the test site’s basic authentication settings.
When migrating your website to a staging environment for testing, it’s often necessary to replace the live website’s hostname (e.g., www.example.com) with the hostname of
the staging environment (e.g., staging.example.com). This ensures that any testing or configuration changes are applied to the staging version rather than the live site.
Step3:
Finally, compare the data from the Live URL and test URL. What are the gaps? How can I improve?
The web migration process
If you’re ready to migrate your website, follow these eight key steps to ensure a smooth transition:
- Set up the new hosting platform or domain
If you’re moving to a new hosting platform, set up the new hosting account and configure any necessary settings. If you’re switching to a new domain, make sure the domain is registered and pointed to the new hosting platform.
- Transfer your website
Use a tool like FTP (File Transfer Protocol) to transfer all of the files from your current website to the new hosting platform or domain.
- Test and debug the new site
Just like you’d walk through your new house to make sure everything is in its place, it’s important to test the new site to make sure everything is functioning properly. This may involve testing the website’s performance, functionality, and usability and fixing any issues or errors that are discovered.
- Update any necessary DNS settings
If you are switching to a new domain, you need to update the Domain Name Settings(DNS) to point to the new hosting platform. This process can take up to 48 hours to fully propagate, so it is important to plan accordingly.
- Redirect traffic from the old site
If you wish to switch to a new domain, set up redirects (301 redirects) from the old domain to the new one to ensure that any traffic to the old site is redirected to the new one.
However, if you own a large website, it is important to prioritize your redirect URLs. Priority should be given to pages that drive the most traffic or generate the most revenue for your new websites. This is essential for maintaining SEO performance and avoiding broken links and 404 errors.
communicate;his point highlights the need for timely communication between development (DevOps) and other teams involved in the migration. Communicating the importance of implementing redirects early in the process ensures that DevOps understands the urgency and can plan their work accordingly.
Common risks associated with web migration, and how to mitigate them.
Web migration carries certain risks that can impact the functionality and accessibility of your website. These risks can occur during the migration process or after the site has been transferred to the new hosting platform or domain.
- Downtime
One of the biggest risks of web migration is that your website may be unavailable or have reduced functionality during the transfer process. To minimize downtime, it is important to plan the migration during a low-traffic period and to test the new site thoroughly before going live.
- Data loss
There is always a risk of data loss during the migration process, which can result in the loss of important website content or information. To mitigate this risk, it is essential to create a full backup of the website before starting the migration and to test the new site to ensure that all content and data have been transferred successfully.
- Broken links or missing content
If the website structure or URL structure changes during the migration, there is a risk that links or content may be broken or missing. To minimize this risk, it is crucial to set up redirects from the old website to the new one and test the new site thoroughly to ensure all links and content are functioning as expected.
- Security breaches
If the website is not properly secured during the migration process, there is a risk of security breaches or cyber-attacks. To mitigate this risk, it is important to use secure methods for transferring website files, such as FTP over SSL, and to ensure that all security measures are in place on the new hosting platform.
- Search engine rankings
If the website’s search engine rankings are impacted during the migration process, it can result in a decline in traffic and revenue. To minimize this risk, it is essential to implement 301 redirects from the old website to the new one and to communicate with search engines to ensure that your website’s ranking are not negatively impacted.
By following best practices and carefully planning the migration process, it is possible to mitigate the risks of web migration and ensure that the website remains fully functional and accessible during and after the migration.